Mastering Depth and Detail with the Under the Sea Laser Cut Bundle – 6 Layers
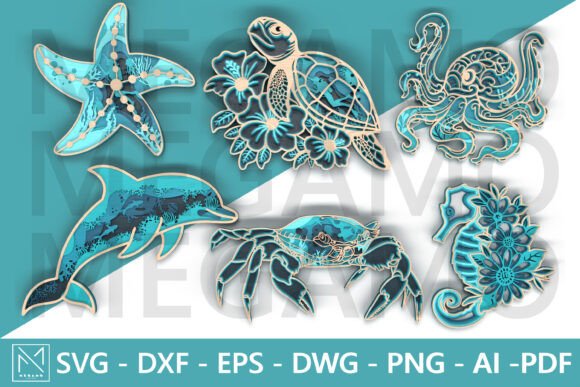
Creating multi-layered wall art or decorative lighting requires more than just a laser cutter and a sheet of acrylic. It demands a keen eye for spacing, material selection, and design compatibility. Many creators dive into ocean-themed projects with enthusiasm but stumble over technical details that compromise the final aesthetic. The Under the Sea Laser Cut Bundle – 6 Layers offers a sophisticated solution by providing pre-engineered, stacked designs featuring marine life such as starfish, dolphins, sea turtles, octopuses, crabs, and seahorses. However, simply downloading the files is not enough to guarantee professional results. Understanding how to leverage these intricate patterns correctly can mean the difference between a flat, confusing cut and a vibrant, dimensional masterpiece.
Avoiding Material Mismatches in Layered Designs
One of the most frequent errors crafters make when working with multi-layer bundles is ignoring material thickness relative to the design’s intended depth. The Under the Sea Laser Cut Bundle – 6 Layers is crafted with specific spacing assumptions. If you choose a material that is too thick, such as heavy-duty plywood, without adjusting the scale, the layers may not stack cleanly, causing gaps or misalignment. Conversely, using material that is too thin can result in a fragile structure that lacks the visual weight necessary for wall art or lamps.
To avoid this, always check the recommended material specifications before cutting. For beginners, 3mm acrylic or birch plywood is often the sweet spot for these types of designs. If you are creating a welcome sign or a decorative lamp, consider how light interacts with the layers. Translucent materials like frosted acrylic can enhance the underwater effect, especially when paired with LED backlighting. Test a single layer first to ensure your machine’s power and speed settings produce clean edges without excessive charring, which can ruin the intricate details of the octopus tentacles or seahorse curls.
Understanding File Compatibility and Software Settings
Another common misunderstanding involves file formats. This bundle includes SVG, DXF, EPS, DWG, PNG, AI, and PDF files, offering broad compatibility with machines like Glowforge, Cricut, Silhouette, and various design software platforms. Yet, many users open the wrong file type for their specific workflow, leading to scaling issues or lost vector paths. For instance, using a PNG file for laser cutting is problematic because it is a raster image, not a vector. This forces the laser to engrave rather than cut, or requires complex tracing steps that often degrade the quality of the fine lines.
Always prioritize vector formats like SVG or DXF for cutting tasks. These formats preserve the precise mathematical paths needed for clean cuts. If you are using software like Adobe Illustrator or CorelDRAW, the AI or EPS files will provide the most editable experience, allowing you to adjust anchor points if necessary. Before sending the job to your laser cutter, zoom in on the design to inspect for any open paths or overlapping lines that might cause the machine to double-cut or hesitate. Taking a few minutes to verify the file integrity saves both material and time.
Scaling Mistakes and Spatial Planning
While the bundle offers fully customizable sizes, resizing multi-layer designs is not as straightforward as scaling a single-image graphic. When you enlarge or shrink the Under the Sea Laser Cut Bundle – 6 Layers, you must ensure that the proportional relationships between the layers remain intact. A common mistake is scaling the design so large that the internal cutouts become too small for the laser bit to navigate, or so small that the details merge into a solid mass.
For example, if you are creating a large statement piece for a living room wall, ensure that the smallest details, such as the eyes of the sea turtle or the texture on the crab shell, remain visible and cuttable. If you find that certain elements are disappearing at your desired size, consider simplifying the design by removing the innermost layers or adjusting the cut tolerance in your software. Always measure your intended display space physically before finalizing the dimensions. A design that looks perfect on screen may feel overwhelming or undersized in a real-world setting.
Assembly Challenges and Adhesive Selection
The final product’s quality often hinges on the assembly process, an area where many DIY enthusiasts overlook critical details. Stacking six layers requires precision. Using too much glue can cause seepage that clouds clear acrylic or stains wood, ruining the vibrant underwater aesthetic. On the other hand, using too little adhesive can lead to layers shifting or detaching over time, especially if the piece is hung on a wall or handled frequently as a gift.
Use a fine-tip applicator for adhesives and apply small dots rather than continuous lines. For acrylic projects, solvent-based cements can create a seamless, weld-like bond that enhances clarity. For wood, a clear-drying PVA glue works well. Allow each layer to set partially before adding the next to maintain alignment. Some creators find it helpful to use temporary tape or clamps to hold the layers in place while the adhesive cures. This patience ensures that the dolphin’s curve or the starfish’s arms align perfectly across all six levels, creating the intended depth and vibrancy.
Maximizing Versatility Beyond Wall Art
Many buyers limit their thinking to standard wall decor, missing out on the bundle’s potential for other creative applications. The Under the Sea Laser Cut Bundle – 6 Layers is ideal for decorative lamps, where the layered shadows create a dynamic interplay of light and dark. It can also be adapted for welcome signs by adding a base plate with text, or used as unique gift toppers for ocean-themed events. Educators can use these designs to teach marine biology concepts through tactile, layered models.
When repurposing these designs, consider the structural integrity. A lamp shade requires different support mechanisms than a flat wall hanging. Ensure that any additional components, such as wiring or mounting hardware, do not interfere with the delicate layers. By thinking beyond the obvious, you can maximize the value of your purchase and create standout pieces that resonate with clients or recipients.
Final Checks Before Cutting
Before you commit to cutting your final material, perform a dry run. Use cardboard or scrap material to test the fit of all six layers. This low-cost step reveals any sizing errors or assembly difficulties without wasting expensive acrylic or hardwood. Check the color contrast between layers if you are using different materials or colors to enhance the underwater scene. A dark blue base with lighter blue upper layers can mimic the ocean’s depth effectively.
The Under the Sea Laser Cut Bundle – 6 Layers provides a robust foundation for high-quality marine-themed projects. By avoiding common pitfalls related to material choice, file handling, scaling, and assembly, you can ensure that your final creation is both visually stunning and structurally sound. Whether you are a seasoned designer or a hobbyist exploring laser cutting for the first time, attention to these details will elevate your work from simple crafts to professional-grade decor.