Crafting Memories: A Complete Guide to Creating an Interactive Scrapbook Album with SVG Cut Files
In the digital age, where thousands of photos sit dormant on our smartphones and cloud storage accounts, there is a profound satisfaction in holding a physical object that tells a story. Scrapbooking has evolved from simple photo pasting into a sophisticated art form known as interactive scrapbooking. This modern approach transforms a standard album into an engaging experience, inviting the viewer to lift flaps, pull tabs, and explore hidden pockets. For crafters looking to elevate their projects, using an Interactive Scrapbook Album SVG Cut File is the most efficient way to achieve professional results without needing advanced engineering skills.
Understanding the Power of Interactive Design
Traditional scrapbooks are linear; you turn the page, see the photo, and move on. Interactive albums, however, add a layer of discovery. They utilize mechanical paper elements such as waterfall cards, twist mechanisms, and multi-layered flaps. These elements serve a dual purpose: they maximize the space available for journaling and memorabilia, and they create a tactile connection between the creator and the viewer. When you craft your own interactive mini album, you are not just preserving images; you are curating an experience.
The significance of this craft lies in its ability to slow down time. In a world of rapid scrolling, an interactive album forces the recipient to pause, engage, and physically manipulate the pages to reveal content. This makes it an ideal medium for significant life events, such as weddings, baby showers, anniversaries, or travel journals. The effort put into constructing these mechanisms translates directly into the emotional value of the gift.
Why Use SVG Cut Files?
For many beginners, the geometry required to create functioning paper mechanisms can be daunting. Calculating hinge lengths, fold lines, and clearance for moving parts requires precision. This is where SVG (Scalable Vector Graphics) cut files become indispensable. An SVG file contains mathematical paths that tell cutting machines exactly where to cut, score, or draw. By using a pre-designed template, you bypass the trial-and-error phase of design and move straight to creation.
These files are designed for compatibility with major cutting machines, including Cricut, Silhouette, and Brother ScanNCut. Whether you are a novice with a basic machine or an experienced crafter with a professional setup, these templates ensure that every fold line is scored accurately and every cut is clean. This consistency is crucial for interactive elements, where a misaligned fold can prevent a flap from closing properly.
What Is Included in a Professional Template Set?
When you purchase a high-quality interactive album template, you are receiving a comprehensive toolkit. Understanding what is included helps you prepare your materials and workflow effectively. A complete set typically provides multiple file formats to ensure compatibility across different software ecosystems.
- SVG Files: Ideal for Cricut Design Space and Silhouette Studio Business Edition. These files retain vector quality, allowing you to resize the project without losing resolution.
- DXF Files: Perfect for users of Silhouette Studio Basic Edition or other CAD-based cutting software that does not support SVG imports natively.
- EPS Files: Useful for graphic designers who may want to edit the shapes in Adobe Illustrator or CorelDRAW before sending them to their cutter.
- PNG Shapes: Separate image files that can be used for reference, digital planning, or manual tracing if you do not have a cutting machine.
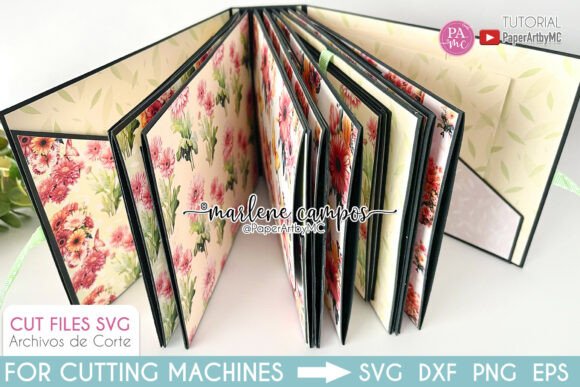
It is important to note that while the structural components are provided, decorative elements are often left to the creator's imagination. Most professional templates, including this specific interactive album set, provide the patterns for covers, pages, spines, and inserts, but do not include decorative papers or cover decorations. This allows for complete creative freedom. You can source decorative papers separately, perhaps from a Creative Fabrica store, to match your specific theme, whether it be vintage, modern, minimalist, or vibrant.
Step-by-Step: From Digital File to Physical Album
Creating your interactive mini album is a rewarding process that blends technology with traditional handcrafting. Here is how you can approach the project to ensure success.
- Preparation and Material Selection: Start by selecting cardstock of appropriate weight. For the base structures and mechanisms, 80lb to 100lb cardstock is recommended for durability. For decorative layers, lighter paper works well. Ensure your cutting mat is clean and your blade is sharp to handle intricate cuts.
- Importing and Resizing: Open your chosen file format in your cutting software. The standard size for this template is 7x5.5 inches, which is a convenient handheld size. However, one of the benefits of vector files is scalability. You can make the album bigger or smaller within the program to suit your needs, keeping in mind that resizing may require adjusting the thickness of the cardstock used for hinges.
- Cutting and Scoring: Assign cut lines to your blade and score lines to your scoring tool. Precision here is key. If your machine lacks a scoring wheel, you can use a stylus or manually score along the indicated lines after cutting. Take your time during this phase, as accurate folds are the backbone of interactive mechanics.
- Assembly and Layering: Begin assembling the spine and covers first. Follow the tutorial included with the files to understand the order of operations. Typically, you will adhere the base pages to the spine, then add the interactive elements like pockets and flaps. Use strong adhesive for structural points and foam tape for dimensional effects.
- Personalization: Once the structure is built, it is time to add your personal touch. Insert your photos, write your journaling entries, and embellish with stickers, die-cuts, or hand-drawn elements. This is where the album truly becomes yours.
Practical Applications and Creative Ideas
The versatility of an interactive scrapbook template means it can be adapted for numerous occasions. Consider creating a "Year in Review" album for family members, where each month has a dedicated interactive spread. For teachers, these albums make exceptional end-of-year gifts for students, filled with memories from the classroom. Businesses can also utilize this format for client portfolios or lookbooks, offering a tangible, high-end alternative to digital PDFs.
Furthermore, these albums are excellent for journaling. The hidden flaps and pockets provide private spaces for thoughts and reflections that you might not want immediately visible, adding a layer of intimacy to your daily record-keeping.
Common Misconceptions About Paper Crafting
Many people assume that interactive albums are too fragile for regular use. However, when constructed with proper cardstock and reinforced hinges, these albums are surprisingly durable. Another common misunderstanding is that you need expensive tools to start. While cutting machines streamline the process, the availability of PNG and EPS files means that even those without electronic cutters can print and trace the templates, making this craft accessible to everyone.
Additionally, some crafters worry that using a template limits creativity. In reality, the template serves only as the skeleton. The skin, soul, and personality of the album come entirely from your choice of papers, colors, photos, and embellishments. Two crafters can use the exact same SVG file and produce two completely unique works of art.
Conclusion
Crafting your own interactive scrapbook mini album is more than just a hobby; it is a method of preserving heritage and expressing creativity. By utilizing an Interactive Scrapbook Album SVG Cut File, you bridge the gap between complex paper engineering and accessible DIY crafting. Whether you are using a Cricut, Silhouette, or ScanNCut, these templates empower you to create heirloom-quality gifts that stand out in a digital world. With the right materials and a bit of patience, you can build a custom album with flaps, pockets, and layers that will preserve your most special memories for generations to come.